

Though there is an option to create an item using the existing flow action, there are times that you need to create an item dynamically. Hence, this topic will tell you the best way to create an item using the ‘Send an HTTP Request to SharePoint’ action. In this example, we will be creating an item in a custom list.
To start, add the ‘Send an HTTP Request to SharePoint’ action in your flow.


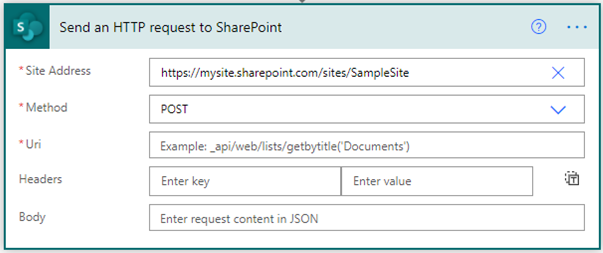
Only three inputs are required in the action – Site Address, Method, and Uri. However, since we are creating an item, you will also need to provide the Headers and Body. Check below the simple descriptions and sample inputs for each field.
Site Address
In the Site Address field, write the site address of the list where you want to create the item.
Ex: https://mysite.sharepoint.com/sites/SampleSite

Method
Because we want to create an item, we will be using POST method. POST request is a request method used to create / update data. It provides secure server communication.
Uri
Uri represents Uniform Resource Identifier. Here, we will provide the rest endpoint that we will be using to create an item. The Uri that we will be using is /_api/web/lists/GetByTitle(‘<List Display Name>’)/Items
Ex: /_api/web/lists/getbytitle(‘Test’)/Items

Headers
The Headers field is not required. However, it is very convenient when accessing and reading the response data. To create an item, we only need one header key – Content-Type.
Key: Content-Type
Value: application/json;odata=verbose

Body
In the Body of the request, we will be using a JSON.
How to build the JSON?
- Provide the internal name of the metadata and its value.
- Provide the metadata type of the item.
Refer to the example below:
{
   "__metadata": {
               "type": "SP.Data.TestListItem"
    },
    "Title": "<title value here>",
    "Description": "<description value here>"
}
For the metadata type value, take note that the value should be SP.Data.<list internal name>ListItem. In this syntax you should take note that you need the list internal name concatenated with ListItem. For example, I have a custom list which has the internal name Test, so the metadata type value should be SP.Data.TestListItem.

Now you are all set. For questions and clarifications, please write it as a comment below. Have a nice day!
App Catalog Authentication Automation Backup Compliance Content Type CSS Flows Google Javascript Limitations List Metadata MFA Microsoft Node NodeJs O365 OneDrive Permissions PnP PnPJS Policy PowerApps Power Automate PowerAutomate PowerPlatform PowerShell React ReactJs Rest API Rest Endpoint Security Send an HTTP Request to SharePoint SharePoint SharePoint List SharePoint Modern SharePoint Online SPFX SPO Sync Tags Teams Termstore Versioning
Thanks for the tip! 1 question though, how can you add an item for a dynamic metadata? Thanks!
Hi Gharman. Did you mean add a dynamic metadata? or add an item dynamically?
There’s certainly a lot to know about this topic.
I really like all the points you’ve made.