


We can’t avoid situations where we need to add items to a list dynamically. Most of the time the data comes from Excel, especially when it originates from other apps. To cut down the time spent adding it manually, it’s best to add it dynamically using Microsoft Power Automate. This post covers copying Excel records to a SharePoint list.
In this post: Preparing the excel file · Building the flow · Getting past the 256-row limit · Avoiding duplicates if the flow gets run twice · Output · Related reading
Preparing the excel file
To start, get the Excel file ready. The file should contain organized data so the items get added efficiently.

Add the items to a table, then label the columns well and make sure the listed items are what you expect. The image above is an example of how the record should look. After preparing the Excel file, upload it to a document library. We want direct access to the file, so it needs to sit inside a document library.

Building the flow
With the Excel record ready, we can start building the flow. First, let’s create a manually triggered flow. Note: you can always choose the trigger that fits your own scenario.
Add the action List rows present in a table. This action gets all the records inside the Excel table. Add the Location of the document library where you uploaded the Excel file.

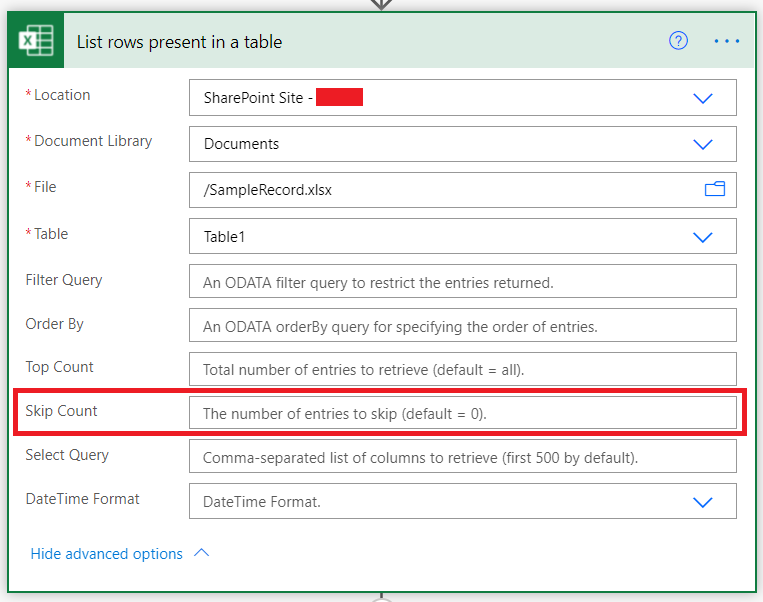
Then select the document library and the file. For the Table field, select Table 1 since we’re only using one table. Note: the ‘List rows present in a table‘ action only gets the first 256 items of the table by default, more on getting past that below.
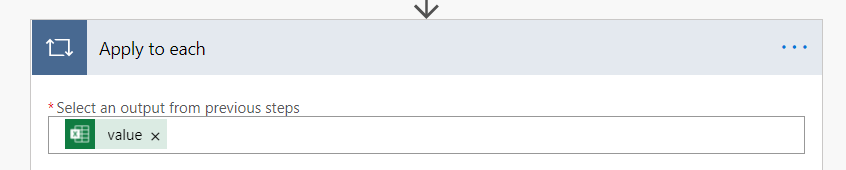
Next, use the Apply to each action to iterate over the items retrieved from the last flow action.
There are times when the Date field isn’t retrieved correctly.
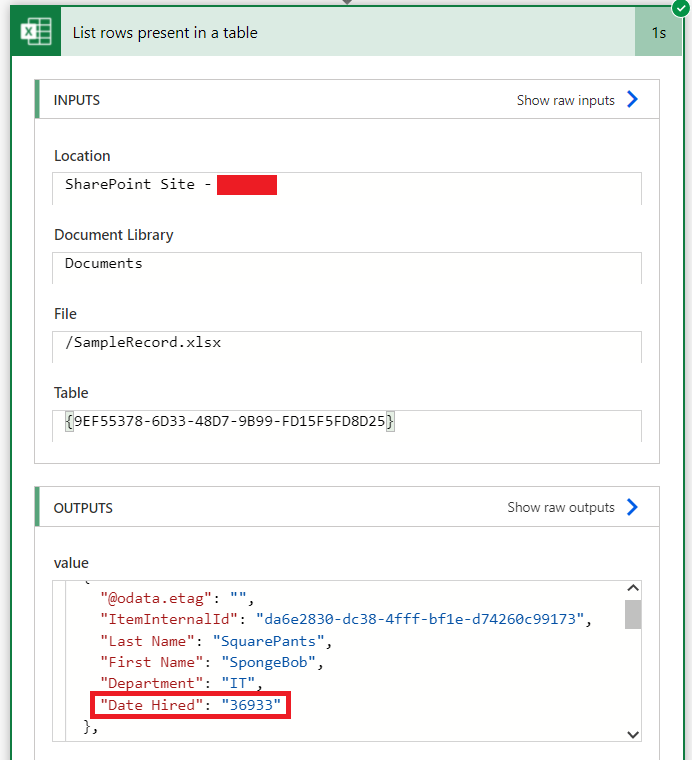
For this, you’ll need to convert the retrieved value to the correct format. Use this formula to convert the date:
addDays('1899-12-31',int(items('Apply_to_each')?['Date Hired']))I added a Compose action as a temporary holder for the value.

Then add the items to the list using the Create Item action. Add the Site Address and the List Name, then enter values for the fields you want filled in. For the Date field, add the Output of the Compose action set up above.

Getting past the 256-row limit
The Skip Count field flagged above technically works around the 256-row cap, but it means manually re-running the flow with a new Skip Count value every 256 rows. Tedious, and easy to get wrong on a table that keeps growing. There’s a built-in, one-time fix instead: open List rows present in a table‘s settings (the “…” menu on the action, then Settings), and turn on Pagination. With pagination enabled, the action retrieves rows page by page automatically, up to whatever threshold you set (up to 100,000 rows) in a single run, without a second Apply to each or a manually-managed Skip Count.
Worth knowing before turning it on and forgetting about it: set the threshold deliberately, not to the maximum by default. An unexpectedly large source table combined with a high threshold can turn a quick manual flow into a much longer-running one. For a table that’s expected to stay under a few hundred rows, a threshold of 1,000 or so gives real headroom without inviting a runaway run against a file that’s grown far beyond what the flow was designed for.
Skip Count works around the 256-row cap manually, one re-run at a time. Turning on Pagination in the action’s own settings handles it automatically, in one run.
Avoiding duplicates if the flow gets run twice
Built as a manually-triggered flow, per Building the flow above, this has a real failure mode: running it twice against the same Excel file (on purpose, to add a few new rows someone appended, or by accident) creates duplicate list items for every row that was already copied over. The Create Item action has no built-in awareness of what’s already in the list; it creates whatever it’s given, every time it runs.
Guarding against it means checking for an existing match before creating, using a column that’s actually unique per row: an employee ID, an invoice number, whatever the source data already treats as a natural key. Add a Get items action inside the Apply to each loop, filtered on that column, before the Create Item action:
- Get items: Site Address and List Name same as Create Item, with a Filter Query like
EmployeeID eq '@{items('Apply_to_each')?['Employee ID']}'. - A Condition checking whether Get items returned any results (
length(outputs('Get_items')?['body/value'])equals0). - Only run Create Item in the “no match found” branch.
This does add a Get items call per row, so it’s not free on a very large table, worth weighing against how likely a genuine re-run actually is for a given flow. For a one-time import that’s realistically only ever run once, skip it; for anything that might legitimately be re-run against an updated source file, it’s the difference between an idempotent flow and one that silently doubles the list every time someone clicks Run again.
If the source data genuinely has no natural key (a plain list of names with nothing guaranteed unique) the same pattern still works filtering on a combination of columns instead of one (name and date, say), it just makes a false-positive “already exists” match slightly more likely on coincidentally identical rows. Worth fixing the source data to have a real unique column if this flow is going to be re-run regularly, rather than leaning on a multi-column filter indefinitely.
Output
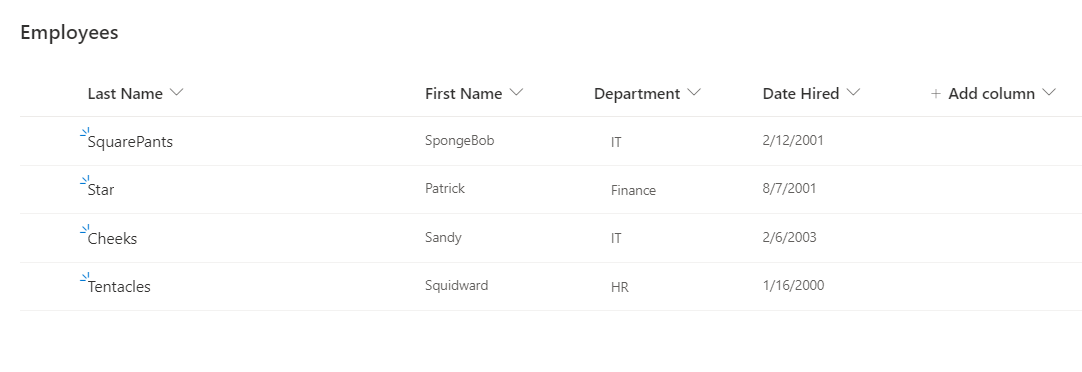
The flow is now ready. Run it to start adding items to the list. Below is an example record copied to the list.
Related reading
- How to Create a SharePoint Site Using Power Automate. Another Power Automate build, including checking a site’s status before acting on it.
- SharePoint Copy Files: Everything You Need to Know. Moving whole files rather than row-level data, with its own Power Automate approach.
That’s it for copying Excel records to a list. If you have any questions about the topic, let me know in the comments below. Have a nice day!
App Catalog Archives Authentication Automation Backup Compliance Content Type CSS Dataverse Google Governance GULP Javascript Limitations List Metadata MFA Microsoft Migration Node NodeJs O365 OneDrive Permissions PnP Policy PowerApps Power Automate PowerAutomate PowerPlatform PowerShell Rest Endpoint Security Send an HTTP Request to SharePoint SharePoint SharePoint List SharePoint Modern SharePoint Online SPFX SPO Sync Teams Termstore Versioning Workflows
How do you deal with choice fields when copying from excel to sharepoint using powerautomate please
Hi Rebecca,
Copying data from choice fields works the same way as single line of text fields. The choice field will add values even if they are not in the choices, regardless of whether “Can add values manually” is turned on or not. For your reference, the “Department” field in my post above is a choice field.