

Though there is an option to create an item using the existing flow action, there are times when you need to create an item dynamically. This post covers the best way to create an item using the ‘Send an HTTP Request to SharePoint‘ action. In this example, we’ll be creating an item in a custom list.
In this post: Site Address · Method · Uri · Headers · Body · Setting a Lookup or Person field in the Body · Getting the new item’s ID back · Updating an existing item instead · Related reading
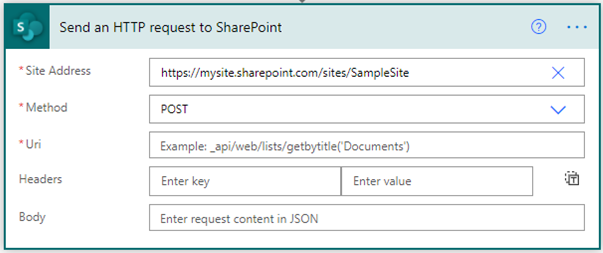
To start, add the ‘Send an HTTP Request to SharePoint’ action in your flow.


Only three inputs are required in the action: Site Address, Method, and Uri. However, since we’re creating an item, you’ll also need to provide the Headers and Body. See the descriptions and sample inputs for each field below.
Site Address
In the Site Address field, write the site address of the list where you want to create the item.
Ex: https://mysite.sharepoint.com/sites/SampleSite

Method
Because we want to create an item, we’ll use the POST method. A POST request is a request method used to create or update data, and it provides secure server communication.
Uri
Uri represents Uniform Resource Identifier. Here, we’ll provide the REST endpoint we’ll use to create an item. The Uri we’ll be using is:
/_api/web/lists/GetByTitle('<List Display Name>')/ItemsEx: /_api/web/lists/getbytitle(‘Test’)/Items

Headers
The Headers field isn’t required. However, it’s very convenient when accessing and reading the response data. To create an item, we only need one header key, Content-Type.
Key: Content-Type
Value: application/json;odata=verbose
Body
In the Body of the request, we’ll use JSON. How do you build it?
- Provide the internal name of the metadata and its value.
- Provide the metadata type of the item.
Refer to the example below:
{
    "__metadata": {
        "type": "SP.Data.TestListItem"
    },
    "Title": "<title value here>",
    "Description": "<description value here>"
}
For the metadata type value, note that it should be SP.Data.<list internal name>ListItem. In this syntax, you need the list’s internal name concatenated with ListItem. For example, a custom list with the internal name Test needs the metadata type value SP.Data.TestListItem.

Setting a Lookup or Person field in the Body
Title and Description above are both plain text, which is the easy case. The field’s internal name maps directly to a JSON property. Lookup columns and Person/Group columns don’t work the same way, and this is the part that trips people up first time: the property name needs an Id suffix appended to the field’s internal name, and the value is the numeric ID of the target item or user, not the display text:
{
    "__metadata": {
        "type": "SP.Data.TestListItem"
    },
    "Title": "<title value here>",
    "AssignedToId": 12,
    "RelatedProjectId": 4
}
A field internal-named AssignedTo (a Person column) or RelatedProject (a Lookup column) becomes AssignedToId / RelatedProjectId in the body, and 12 / 4 are the actual SharePoint user ID or lookup item ID, not the person’s name or the lookup item’s display value. If the column allows multiple values, the shape changes again, to an object with a results array of IDs instead of a single integer:
{
    "MultiAssignedToId": {
        "results": [12, 15, 22]
    }
}
Getting the actual ID to plug in usually means a separate lookup first (querying /_api/web/siteusers to resolve a person’s email to their SharePoint user ID, or querying the target list to find the lookup item’s ID) before this create-item call can run. That extra step is exactly why this is easy to miss: nothing about the Title/Description example above hints that a different field type needs an entirely different property shape.
Getting the new item’s ID back
Creating the item is rarely the last step in a real flow. Usually the next action needs to do something with the item just created, like attach a file to it or update a related list with a reference back to it. The response body from this same POST call already contains everything needed for that; it doesn’t require a second lookup. With the application/json;odata=verbose header from the Headers section above, the new item’s ID comes back at body('Send_an_HTTP_request_to_SharePoint')?['d']?['Id'] in a subsequent action’s dynamic content expression.
Worth double-checking the exact action name inside that expression. Power Automate generates it from whatever this action was renamed to, so copying the expression verbatim from another flow only works if the action name matches exactly. Referencing the raw outputs() of the action rather than typing the expression by hand avoids this mismatch entirely.
Updating an existing item instead
Everything above creates a brand-new item. Updating one that already exists uses the same action with three changes: the Uri points at a specific item by ID instead of the list’s Items collection, the Method changes, and an extra header is required:
| Field | Value |
| Uri | /_api/web/lists/getbytitle('Test')/Items(5) |
| Method | POST (SharePoint’s REST API updates via POST plus a header, not a literal PUT/PATCH verb) |
| Headers | Content-Type: application/json;odata=verbose, X-HTTP-Method: MERGE, If-Match: * |
The Body only needs the fields actually changing. MERGE updates just the properties you send and leaves everything else on the item untouched, unlike a full replace that would reset unlisted fields to their defaults. If-Match: * tells SharePoint to apply the update regardless of whether the item’s changed since it was last read; a specific ETag value there instead enforces optimistic concurrency (the update fails if someone else changed the item in between), which matters more once a flow is updating items other people might also be editing.
Lookup and Person fields need an Id suffix on the property name, and the value is the item or user’s numeric ID, not its display text.
Related reading
- Exploring SharePoint REST API Endpoints. More REST endpoints and query options beyond item creation.
- Get SharePoint Site Users. How to resolve a person’s SharePoint user ID, needed for the Person-field example above.
Now you’re all set. For questions and clarifications, please write it as a comment below. Have a nice day!
App Catalog Archives Authentication Automation Backup Compliance Content Type CSS Dataverse Google Governance GULP Javascript Limitations List Metadata MFA Microsoft Migration Node NodeJs O365 OneDrive Permissions PnP Policy PowerApps Power Automate PowerAutomate PowerPlatform PowerShell Rest Endpoint Security Send an HTTP Request to SharePoint SharePoint SharePoint List SharePoint Modern SharePoint Online SPFX SPO Sync Teams Termstore Versioning Workflows
Thanks for the tip! 1 question though, how can you add an item for a dynamic metadata? Thanks!
Hi Gharman. Did you mean add a dynamic metadata? or add an item dynamically?
There’s certainly a lot to know about this topic.
I really like all the points you’ve made.