


The Events web part surfaces upcoming items from a SharePoint Events list on a modern page. Straightforward to add, but worth knowing its real limits before assuming it handles more than it actually does. The most common assumption that trips people up: it does not include built-in RSVP or registration, despite that being the first thing most people want from an events page.
In this post: What it actually does · Adding and configuring it · Audience targeting: a 3-step process · No native RSVP. Here’s what that means · The column limitation worth knowing up front · When would you actually use this? · Related reading
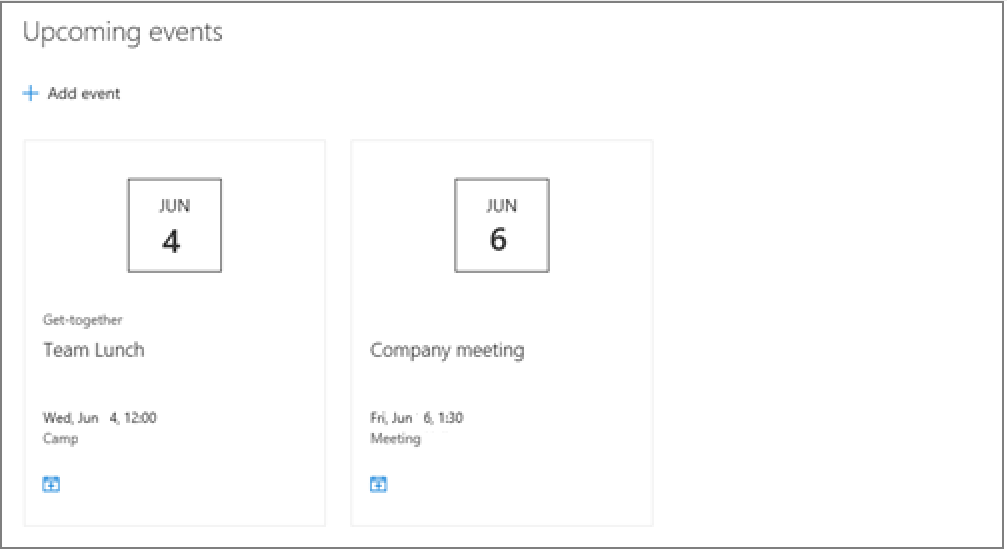
What it actually does
The web part pulls events from a SharePoint Events list on the current site (or another site you point it to) and displays them in one of two layouts, not three or four: Filmstrip, a visual horizontal-scrolling layout suited to a 1/3-width column and event promotion, or Compact, a lighter list-style layout that fits smaller columns and works better on a dense intranet dashboard. There’s no separate “calendar view” built into the web part itself, for an actual month-grid calendar, that’s the SharePoint calendar app/list rendered directly, a different thing from this web part.
Filtering options are real and specific, not vague “customize the date range”. The built-in timeframe filter is one of: all upcoming events, this week, next two weeks, this month, or this quarter. You can also filter by event category if the underlying list has categories configured, and set how many events display at once (the default is 20).
Adding and configuring it
- Edit the page, click the “+” to add a web part, and search for “Events.”
- Point it at the events source: the current site’s Events list by default, or another site’s list if you’re rolling up events from elsewhere.
- Set the layout (Filmstrip or Compact), the timeframe filter, category filter if applicable, and how many events to show.
- Save and publish.
That’s genuinely the whole configuration surface. There isn’t a deeper settings pane hiding more options once you’ve set those four things.
Audience targeting: a 3-step process
Showing different events to different groups is a real, supported feature: but it’s a three-step setup, not a single toggle, and skipping a step is why it silently doesn’t work for a lot of first attempts. First, audience targeting has to be enabled on the underlying Events list itself: Site Contents > the Events list > Settings > Audience targeting settings > check “Enable audience targeting.” Second, each individual event needs its audiences actually assigned. Edit the event, add up to 50 Microsoft 365 or Entra security groups in the Audience field, and save; an event with the feature enabled but no audience assigned just displays to everyone, not to no one. Third, the web part itself needs audience targeting switched on in its own settings pane, then the page republished, enabling it on the list without also enabling it on the web part leaves the setting inert.
The Events web part has no built-in RSVP or registration. That’s the single most common wrong assumption people make about it before actually configuring one.
No native RSVP. Here’s what that means
Worth stating plainly since it’s the most common wrong assumption: out-of-the-box, the Events web part has no registration, RSVP, capacity limit, or attendee-tracking functionality at all. Clicking an event opens its details page (title, date, location, description) with no “I’m attending” button anywhere in the standard experience. If registration is a real requirement, not a nice-to-have, there are two realistic paths: a third-party web part built specifically for event registration (several exist in the marketplace, worth evaluating on cost and whether it needs to talk to your existing Events list), or a DIY approach using a Microsoft Form or a second SharePoint list for registrations, tied together with a Power Automate flow that sends a confirmation and updates an attendee count. Neither is as seamless as a built-in button would be, but both are realistic without buying a dedicated event-management product for something like a single monthly all-hands.
The column limitation worth knowing up front
A second real gap, easy to hit once you’re already committed to using the web part: adding a custom column to the underlying Events list (an RSVP deadline, a capacity number, an internal contact) doesn’t make it show up in the web part’s display. The web part renders a fixed set of fields (title, date, location, image, description); custom columns exist in the list and are visible there, but the web part simply doesn’t surface them, with no configuration option to add one. If a piece of information genuinely needs to be visible on the events page itself rather than one click away in the list, that’s a sign this web part isn’t the right display layer for it. Either fold it into the description field, or build a custom view/web part that actually reads the column.
When would you actually use this?
- A simple internal events calendar: all-hands, holidays, training sessions, where “know it’s happening” is the goal, not registration tracking.
- Promoting events visually on a landing page or intranet homepage, where the Filmstrip layout’s visual pull is the actual point.
- Rolling up events from a central site into department sites, using the “another site’s list” source option rather than duplicating events manually in each location.
- You need attendee registration or capacity limits: that’s a sign to pair this with a form/flow, or evaluate a dedicated event-management add-on, not to keep looking for a hidden setting that isn’t there.
Related reading
- Microsoft Calendar vs. Microsoft Bookings. When scheduling needs go beyond a static events list entirely.
For a simple, visually clean way to surface upcoming events, the built-in web part does the job in a few clicks. The gap is entirely on the interaction side, and worth planning around explicitly rather than discovering after the page is already built and someone asks where the RSVP button is.
App Catalog Archives Authentication Automation Backup Compliance Content Type CSS Dataverse Google Governance GULP Javascript Limitations List Metadata MFA Microsoft Migration Node NodeJs O365 OneDrive Permissions PnP Policy PowerApps Power Automate PowerAutomate PowerPlatform PowerShell Rest Endpoint Security Send an HTTP Request to SharePoint SharePoint SharePoint List SharePoint Modern SharePoint Online SPFX SPO Sync Teams Termstore Versioning Workflows
Sadly, it is not possible to add another column in the view with specific details (eg. a RSVP Deadline). The extra column can be added in the list ‘behind’ the site, but does not syncronize to the webpart. Huge problem for us.
Hello Nina, Yeah that is one of the challenges for the webpart. But there is actually some work around you can apply. One of those is creating a custom webpart via SPFx and build it so you will have flexibility on functionalities that you want to add on the webpart.