

In this post: Overview · The Problem · The Solution · Applying it to many sites at once, without the UI · Related reading
Overview
Modern SharePoint now allows site owners to customize and apply custom styles and colors to their site, making it easier to manage and define branding across site collections. These capabilities are available to site administrators via PowerShell cmdlets, the SharePoint client-side object model (CSOM), or the SharePoint REST API.
Branding your SharePoint site was pushed by the SharePoint Development team as an easy, set action for privileged users. Changing the look of the site to match your organization’s branding is an awesome piece of functionality, isn’t it? You can customize navigation, colors, and even your site logo without writing a single line of code.
There are some default themes already available to use out of the box:
- Teal
- Blue
- Orange
- Red
- Purple
- Green
- Gray
- Dark Yellow (inverted theme)
- Dark Blue (inverted theme)
You can see these by clicking the gear icon (⚙️) in the top right corner of your SharePoint site, then clicking ‘Change the Look‘. Something like the image below shows up in the right panel of the screen.
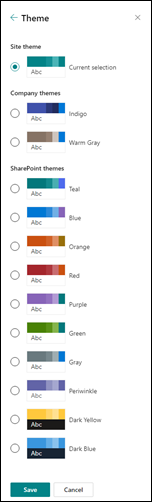
Selecting any theme, then clicking the ‘Apply’ button at the bottom of the panel, applies it automatically to your site. If your site is a Hub site, every site using it as their hub will also use the same theme. To sum it up, a theme can be applied to a group of sites (via hub structure), a single site, or all sites inside the organization.
The Problem
You’re working with a new client, and they require specific branding for their SharePoint Online intranet hub site, based on their company logo’s branding. It would be easy to apply this if the requested theme were already among the default themes SharePoint Online provides, but no, none of the defaults are close to what the company wants.
The Solution
Good thing there’s an option to add a custom theme. This functionality is only available to site administrators, owners, or users with permission roles for branding the site.
As stated in the overview, there are 3 options for installing a custom theme: via PowerShell, via CSOM, or via the REST API. We’ll use the most common and easiest way: PowerShell.
First, download and install the latest version of the SharePoint Online Management Shell, or open PowerShell as an administrator and install it from the PowerShell Gallery:
Install-Module -Name Microsoft.Online.SharePoint.PowerShellRun this command in your PowerShell session:
Connect-SPOService -Url https://{TENANTNAME}-admin.sharepoint.comYour shell is now ready to accept and run SharePoint shell commands.
Let’s generate our custom theme from the Fluent UI Theme Designer. There you can see available options for your theme. Select a primary color, and in the top right corner of the page, click the ‘Export theme‘ button. A panel on the right side of the page will prompt, click the ‘PowerShell‘ tab.

Copy and paste it somewhere (your notepad, for now) we’ll need that piece for our custom theme.
In your PowerShell, store your copied theme in a custom variable. Let’s call it $companyTheme: like below:
$companyTheme = @{
"themePrimary" = "#0078d4";
"themeLighterAlt" = "#eff6fc";
"themeLighter" = "#deecf9";
"themeLight" = "#c7e0f4";
"themeTertiary" = "#71afe5";
"themeSecondary" = "#2b88d8";
"themeDarkAlt" = "#106ebe";
"themeDark" = "#005a9e";
"themeDarker" = "#004578";
"neutralLighterAlt" = "#faf9f8";
"neutralLighter" = "#f3f2f1";
"neutralLight" = "#edebe9";
"neutralQuaternaryAlt" = "#e1dfdd";
"neutralQuaternary" = "#d0d0d0";
"neutralTertiaryAlt" = "#c8c6c4";
"neutralTertiary" = "#a19f9d";
"neutralSecondary" = "#605e5c";
"neutralPrimaryAlt" = "#3b3a39";
"neutralPrimary" = "#323130";
"neutralDark" = "#201f1e";
"black" = "#000000";
"white" = "#ffffff";
}
Then use Add-SPOTheme: part of the same SharePoint Online Management Shell module already installed above, not a PnP PowerShell cmdlet. Append the code below to your custom theme variable.
Add-SPOTheme -Identity "My Company Theme" -Palette $companyTheme -IsInverted $falseThe final script would look like this:
$companyTheme = @{

"themePrimary" = "#0078d4";
"themeLighterAlt" = "#eff6fc";
"themeLighter" = "#deecf9";
"themeLight" = "#c7e0f4";
"themeTertiary" = "#71afe5";
"themeSecondary" = "#2b88d8";
"themeDarkAlt" = "#106ebe";
"themeDark" = "#005a9e";
"themeDarker" = "#004578";
"neutralLighterAlt" = "#faf9f8";
"neutralLighter" = "#f3f2f1";
"neutralLight" = "#edebe9";
"neutralQuaternaryAlt" = "#e1dfdd";
"neutralQuaternary" = "#d0d0d0";
"neutralTertiaryAlt" = "#c8c6c4";
"neutralTertiary" = "#a19f9d";
"neutralSecondary" = "#605e5c";
"neutralPrimaryAlt" = "#3b3a39";
"neutralPrimary" = "#323130";
"neutralDark" = "#201f1e";
"black" = "#000000";
"white" = "#ffffff";
}

Add-SPOTheme -Identity "My Company Theme" -Palette $companyTheme -IsInverted $false
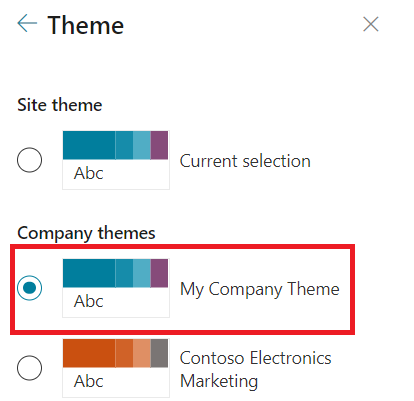
Copy and paste it directly into PowerShell, and verify that your custom theme was added successfully by checking the theme selection panel.
Applying it to many sites at once, without the UI
Add-SPOTheme only registers the theme in the tenant’s theme gallery. Actually applying it to a site still means opening Change the Look and selecting it manually, per the Overview above. Fine for one site, tedious for a hub with dozens of associated sites that all need the same branding rolled out at once. PnP PowerShell’s Set-PnPWebTheme closes that gap. It applies an already-registered theme directly to a specific site, no UI click-through required:
Connect-PnPOnline -Url "https://{TENANTNAME}-admin.sharepoint.com" -Interactive

Set-PnPWebTheme -Theme "My Company Theme" -WebUrl "https://{TENANTNAME}.sharepoint.com/sites/YourSite"

# Loop it across every site associated with a hub for a one-shot rollout
$hubSites = Get-PnPHubSiteChild -Identity "https://{TENANTNAME}.sharepoint.com/sites/YourHub"
foreach ($site in $hubSites) {
    Set-PnPWebTheme -Theme "My Company Theme" -WebUrl $site
}
Note this connects to the tenant admin URL, not the target site. Set-PnPWebTheme requires tenant admin rights and an admin-site connection, even though -WebUrl points at the site actually being branded. This is the actual answer to “roll this theme out to the whole hub” without asking every site owner to click through Change the Look individually.
Add-SPOTheme only registers the theme. Applying it to a specific site still needs Set-PnPWebTheme or a manual click through Change the Look.
Related reading
- Understanding SharePoint Hub Sites. The hub structure this theme’s rollout depends on when applied at scale.
- A Comprehensive Guide to SharePoint Site Design. Theming is one piece of the broader site design picture covered here.
Alright! That’s another tip right there for SharePoint. Hope this somehow helps someone.
App Catalog Archives Authentication Automation Backup Compliance Content Type CSS Dataverse Google Governance GULP Javascript Limitations List Metadata MFA Microsoft Migration Node NodeJs O365 OneDrive Permissions PnP Policy PowerApps Power Automate PowerAutomate PowerPlatform PowerShell Rest Endpoint Security Send an HTTP Request to SharePoint SharePoint SharePoint List SharePoint Modern SharePoint Online SPFX SPO Sync Teams Termstore Versioning Workflows
Pingback: Actually, It’s Already In The SharePoint PageContext! - tipsbybits.com